How to Cut and Work with Polycarbonate Sheets
At Del Sol, our years of experience has taught us a lot, including what not to do! If you’ve never worked with polycarbonate panels or sheets before, below you will find a few tricks of the trade that come in handy during polycarbonate installation! And as always, if you have any questions, please reach out to us!
Polycarbonate Installation Downloads
Cutting
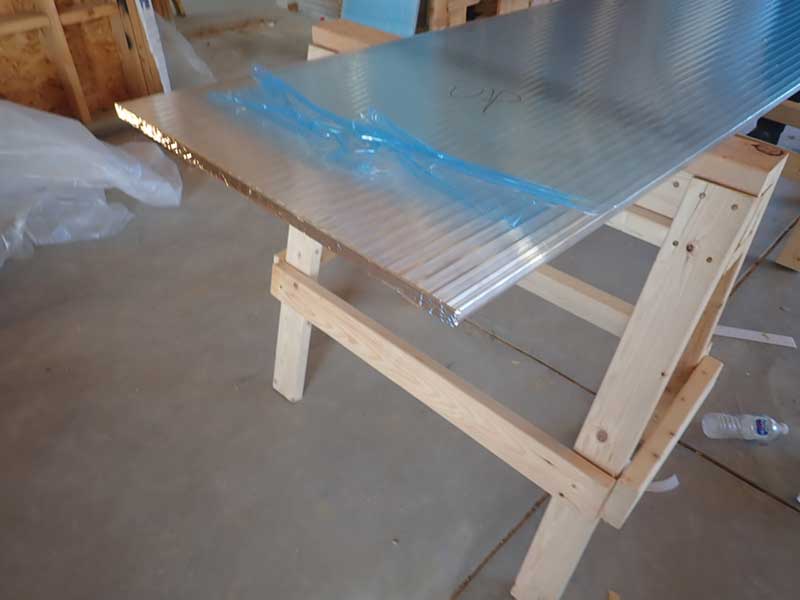
Polycarbonate panels can be cut to any size or shape. The best tool to use is a circular saw (electric or battery). When using a circular saw it’s best to use a fine-tooth carbide-tipped blade. A standard blade can also be used but not with fine results. When cutting curves and shapes, always use a jigsaw with a fine-tooth blade as well. When cutting, always make your cutting marks with a dark Sharpie type of pen – this makes for a dark line that is easily traceable and makes cutting easier. All polycarbonate sheets come with protective film on both sides. Make sure that when cutting, leave the protective film on. Make your cut, and then peel away before installing.
Drilling
Drill with a high speed steel- or carbide-tipped drill bit. Drill holes slightly larger than the shaft of the drill bit to allow for expansion and contraction. Never drill the hole too close to the edge of the polycarbonate sheet. It’s best to drill at least a 1/2″ – 1″ in from the edge. If H-channels and U-channels are used, drilling on the edge of the panel is not necessary. For outdoor application, always use stainless steel or galvanized hex head screws with neoprene washers. Do not over tighten the hex head, as this will create dimples on the sheet and will cause leaks over time. Fasten heads of the screw snug to the outer surface of the sheet.
Blow Out the Flutes Before You Tape and Install
Make sure to have an air blower handy, as cutting always leaves polycarbonate sawdust crumbs that statically cling to the inside of the airspace flutes. Blow these crumbs out before installing, or they will be there forever.
Polycarbonate Installation
After all cuts have been made, you’re ready to install. Before handling and installing, peel back around 2″ of the protective film on both sides of the polycarbonate sheet. It’s best to use skin-tight gloves to avoid fingerprint smudges, as this will be very visible at certain angles, especially for roof applications. All polycarbonate sheets will always indicate which side goes towards the sun. As soon as it’s installed, peel away the protective film. In some cases, especially for overhead larger panels, after making cuts, I always remove the protective film on the interior side of the application, making sure I have my gloves on to avoid oily finger smudges. Once I have secured the roof panel in place, then I remove the outer protective film.
Structure Support Frame
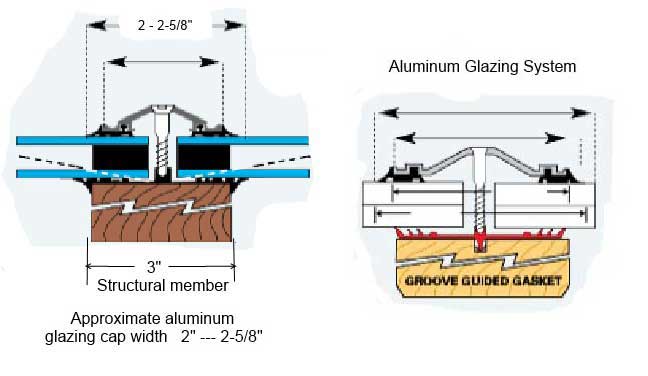
If you are framing your structure with wood, it is best to have a 3-inch wide framing surface wherever two polycarbonate panels are joined. If using polycarbonate H-channel profiles, these are about 3″ wide. If using an aluminum glazing system on top of a wood frame, these also are approximately 3-inches wide. In order to accommodate a 3-inch connector profile, whether it’s polycarbonate or aluminum, you can use 3 x 3 glue-lams or sister/join together two 2×4 or 2×6 structural wood members wherever two polycarbonate panels are joined together.
Caulking
Always use 100% pure silicone clear caulking on the exterior of each seal especially at the bottom of the polycarbonate panel. A protective bead will help to seal the ends and keep the U-channel from detaching itself from the sheet.
Cleaning and Storing Polycarbonate Panels
Always use mild dishwater soap with Luke warm water, never use abrasives. Use a soft cloth or sponge then rinse with hose water.. Storing: Polycarbonate sheets should always be stored out of direct sunlight.
Glazing Tape
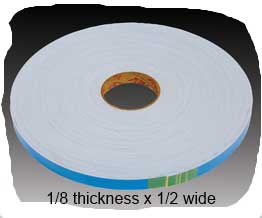
Glazing tape is highly recommended for all roof glazing applications. It is narrow – usually 1/2-inch wide x 1/8-inch or 1/16-inch thickness, and extremely sticky on both sides. This is especially useful when attaching polycarbonate to metal frames. This also helps to seal the panels to the frame and to the glazing top cap to prevent leaks.
How to Apply Glazing Tape During Polycarbonate Installation
Spray the Tape
When applying glazing tape to any surface, it’s best to spray the tape and the surface with soapy warm water before applying the panel. First, apply the tape to the frame, then peel back and fold the protective film from the upper side back about two inches. This allows you to make slight adjustments when setting the panel to its final destination.
Peel Away the Remaining Film
Once the panel is square with the frame member and in place, then peel away the remaining film from the sticky tape. Now you can put pressure on the panel to seal it against the tape.
Screw the Cap Closures
Once permanent contact is made, proceed to screw the cap closures to secure the polycarbonate panel to the frame. Be aware that glazing tape, once applied, makes it very difficult to shift or move the panel if the tape is not wet.
Glazing Tip
It helps to put glazing sticky tape along the top surface edge of the purlin to muffle sounds from rain, expansion and contraction. Mark the edge of the end rafter where each purlin will be attached, then attach a temporary string line from one end of the gable rafter to the end of the opposite gable rafter and follow the string line. This will insure that all Purlin supports will run straight and inline.
Channel Lengths
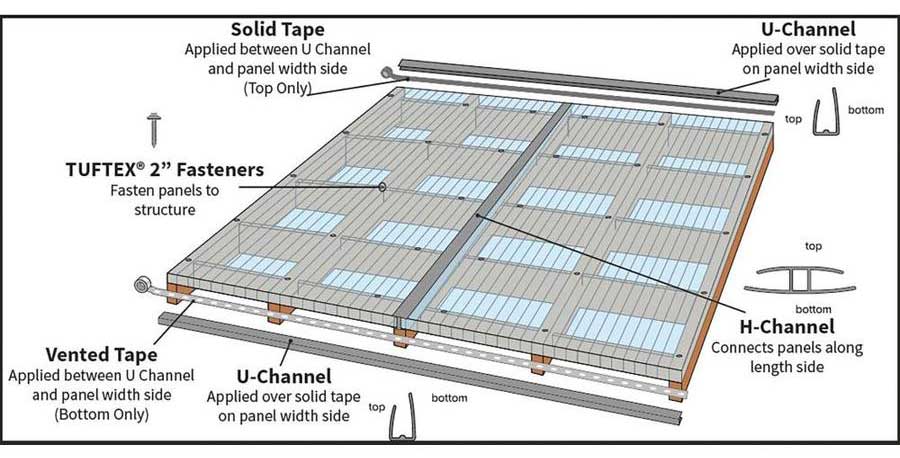
U-channels are used for the open ends of the polycarbonate sheet: top,and bottom. All standard panels/sheets come in 4-foot and 6-foot widths. U-channels are highly recommended and should be used for all applications. U-channels will help to seal the open ends and prevent dust and little critters from accumulating at the bottom of the panel.
In addition, the aluminum tape is also recommended for both ends prior to installing the U-channel. Aluminum tape is available at most big box home centers. The bottom of the panel should have pin-sized weep holes to allow air to dry up any condensation that forms inside the air flutes. Always use both the aluminum tape and the U-channel to seal top and bottom ends.
- H channels are sold in 24-foot lengths
- U-channels are sold in 12-foot lengths
Polycarbonate Fastening
Fastening polycarbonate to structural framing members is relatively easy. At every panel seam / joint there should be a 3” wide H channel or an aluminum extrusion of the same width, joining two panels together.
The center of the H-channel is where hex head screws are applied onto the support rafter. Always use galvanized or stainless steel hex head screws with neoprene self-sealing washers. For metal structural members use self drilling screw points.
For wood or PVC structural members standard sharp point screws work extremely well.
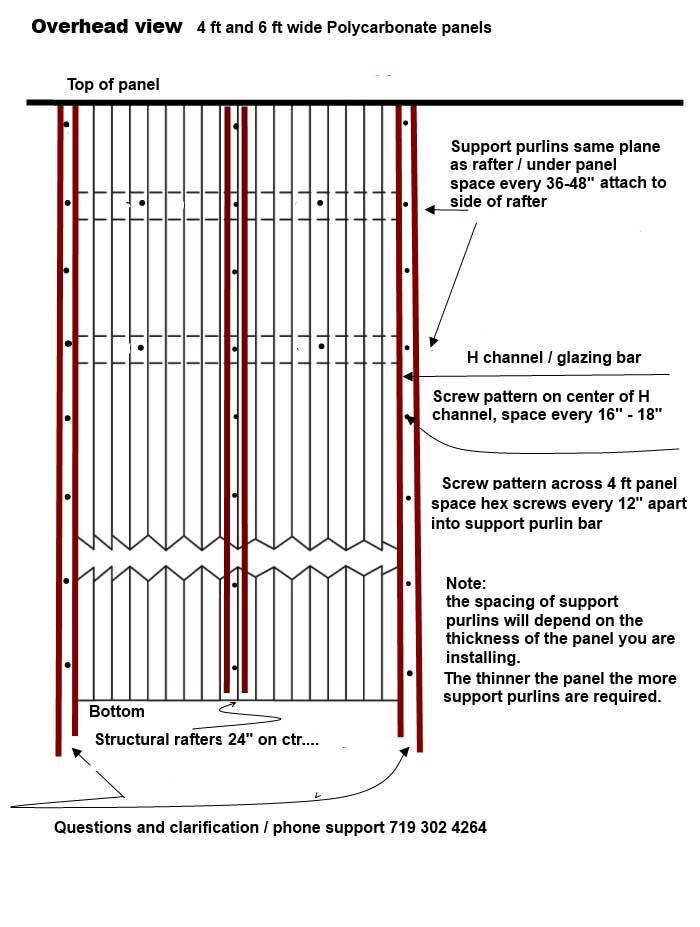
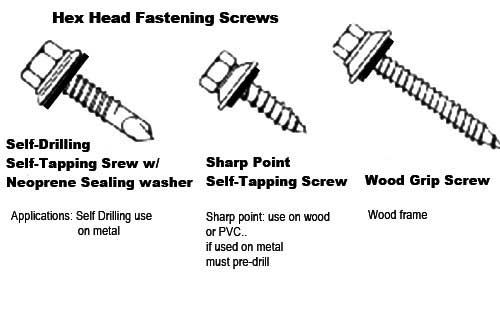
Polycarbonate Hex Screw Patterns
When attaching polycarbonate panels to any framing member, always use hex screws with self sealing neoprene washers. The thickness of the panel will determine the length of the hex screw to use. For most panel applications, hex screws that are 1″ to 1-1/2″ long will usually work just fine. Since most polycarbonate applications are for outdoor exposure, always use galvanized or stainless steel.
It is vital to install hex screws in an even and straight line pattern. This can be accomplished in a number of ways. The easiest and quickest way is to use a measuring stick as a template or attach a temporary string line. Make sure that hex screws are not over tightened. They should rest snug and secure to the top surface of the panel.
Polycarbonate Support Purlin Spacing
When attaching perpendicular support purlins to rafters make sure they are even and flush with the top of the rafter. All support purlins must be on the same plane as the rafter. If using a glazing bar system, make sure to set the top of the support purlin even as the same plane with the glazing gasket of the glazing bar of the rafter.
Construction Note
Always allow 1/4-inch to 1/2-inch joint spacing between any polycarbonate panel joint.
Polycarbonate Technical Data
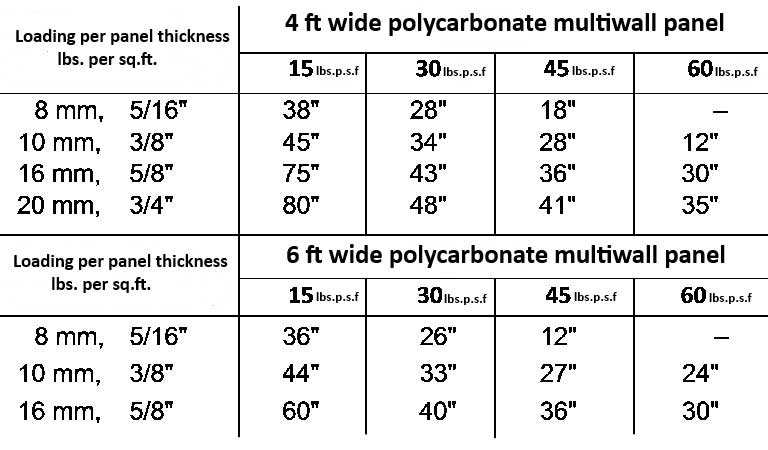
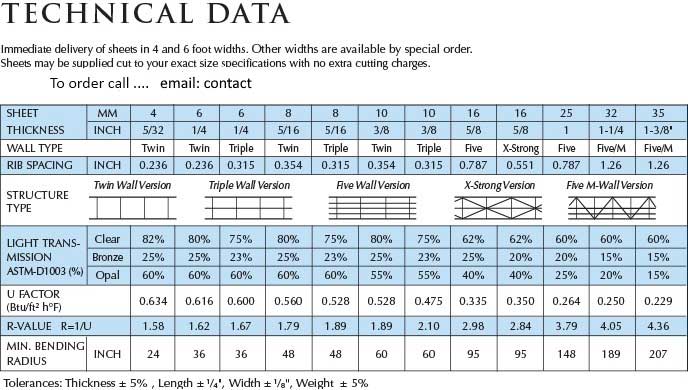
Accessories
Aluminum Glazing Systems
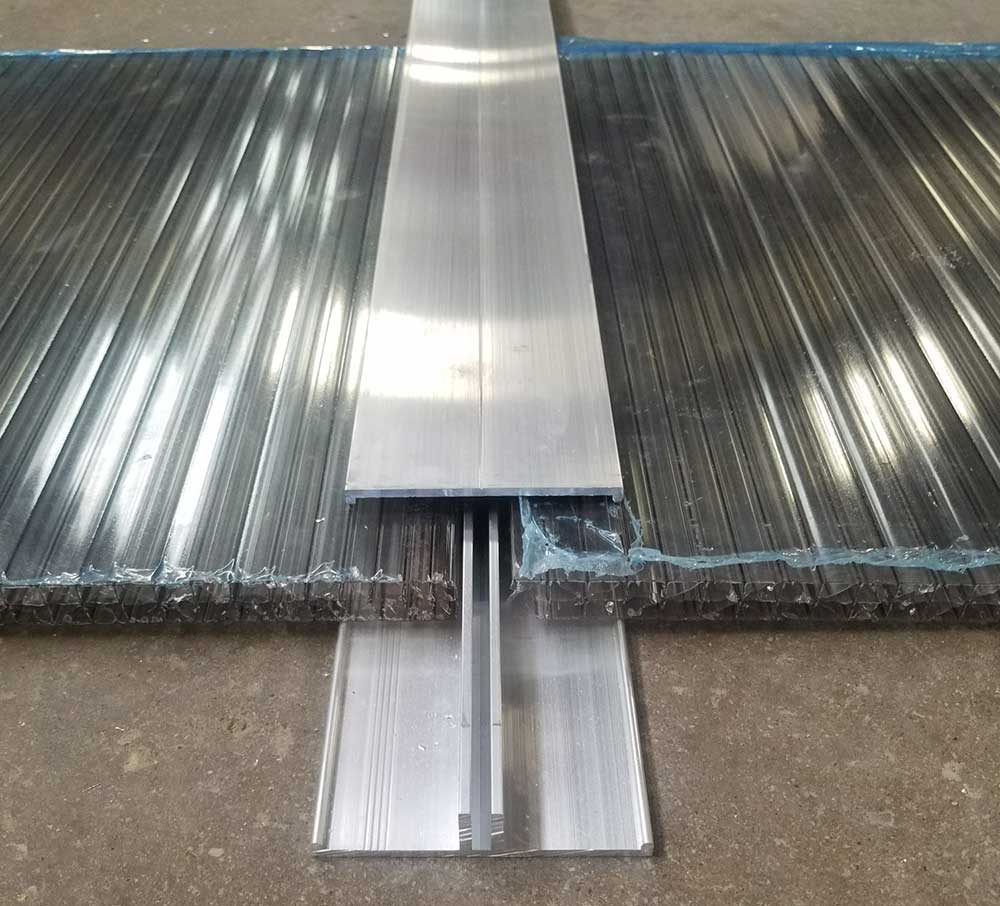
Aluminum glazing systems is the preferred choice for large dimensional timber structures. They are the most reliable and strongest for fastening to the top of timber rafters and/or vertical wood posts. Aluminum glazing extrusion bars are screwed onto the top of the rafter and/or wall post, and then the polycarbonate panel is placed on top of the glazing EDPM glazing gasket of the aluminum glazing bar.
The polycarbonate or glass is then clamped in place by an aluminum extrusion cap closure, which also has a glazing gasket and/or tape. The cap closure is fastened into place with stainless steel screws, which clamp the glazing panel down securely.
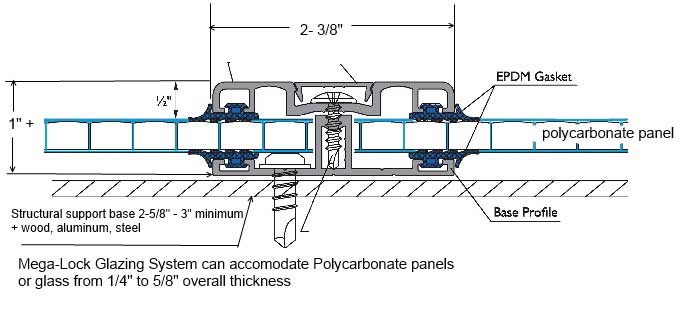
This application provides a stronger and a longer lasting seal and 98% of the time, does not require the use of caulking along the exterior edges of the cap closure. When building a glazed structure, the use of quality silicone caulk is highly recommended. Connections at doors, windows, walls, ridge and vent connections, eaves, and sill plates are areas where moisture is prone to enter. Caulking the exterior glazed connection at the edge of any down slope eave is also recommended for a longer trouble free connection.
Utilizing an aluminum glazing system offers an important advantageous feature: it keeps the interior glazing surface away from the wood. Condensation must have a way to weep away. Moisture and wood do not make for a long lasting relationship. Over time, the condensation and moisture on any structural wood surface will begin to rot and will eventually lead to an expensive repair job. Why in the world would anyone go there? Surprisingly and, unfortunately, many do just that.
Installation Tip
Polycarbonate panels are supplied with a protective PE film which should be kept on until the sheet is installed. The UV-protected side is to be faced towards the sun and is marked with a white printed film, light blue film or a sticker saying Macrolux multi-wall polycarbonate sheet. Macrolux panels should be stored in an area not exposed to the sun, or indirect heat from the sun, which could make the removal of protective film difficult.
Imagine what you will grow!!
If you’ve always wanted a greenhouse to grow plants and flowers, let’s get started! Let us help you get the polycarbonate you need for your greenhouse or sunroom. We provide quality, great service, installation tips, and help you get the best prices! Best of all, you save money on shipping and crating by picking up your Colorado polycarbonate panels yourself! And if you want a custom greenhouse or sunroom, we can help with that too!
